The first time I cooked beef cheeks, I was skeptical. This oddly named cut wasn’t something I grew up eating, and I wondered if the effort would be worth it. Five hours later, as I took my first bite of that impossibly tender meat bathed in a rich, glossy sauce, I became an instant convert.
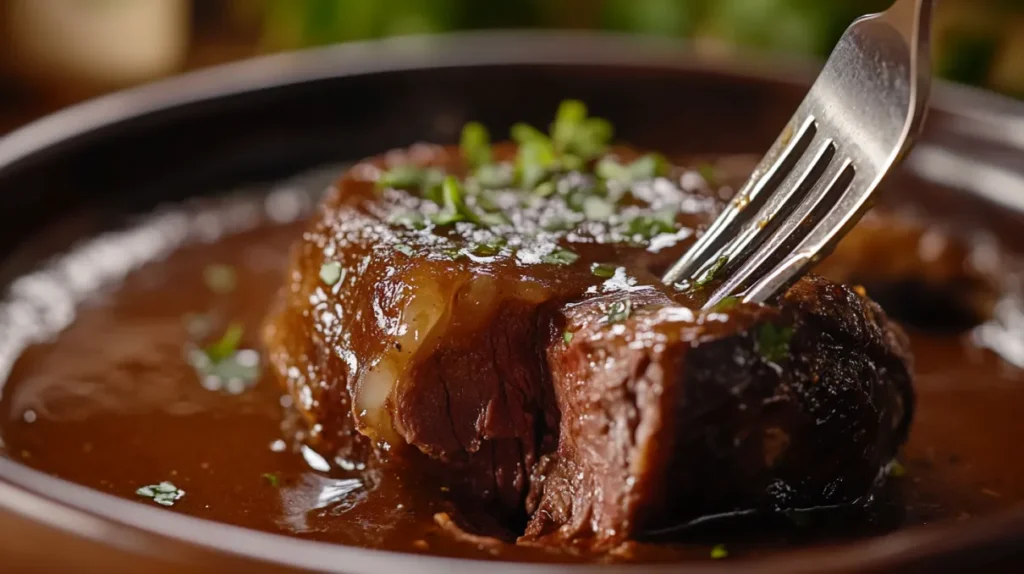
Beef cheeks aren’t just another braising cut. The constant work these facial muscles do throughout the animal’s life creates a unique texture that, when cooked properly, achieves a buttery consistency other cuts simply can’t match. The flavor is intensely beefy with complex notes that develop during the long, slow cook.
What I love most about this beef cheek meat recipe is how it turns a humble, often overlooked cut into something worthy of a special occasion. Despite the impressive results, the process is remarkably straightforward – just sear, simmer, and let time work its magic.
Whether you’re looking to impress guests at your next dinner party or simply want to treat yourself to something special on a lazy Sunday, these braised beef cheeks deliver restaurant-quality results right in your home kitchen.
Why You’ll Love This Recipe
There’s something deeply satisfying about transforming tough cuts into tender, flavorful dishes. It’s old-school cooking at its finest – the kind that connects us to generations of home cooks who knew how to make the most of every part of the animal.
What makes this best beef cheek recipe worth your time? First, there’s the incredible texture. When properly cooked, beef cheeks develop a melt-in-your-mouth quality that’s almost custard-like, yet they still maintain their structure on the plate.
Then there’s the flavor payoff. The long cooking process allows the meat to absorb all the aromatics in the braising liquid, creating layers of flavor that just aren’t possible with quick-cooking methods. The sauce that develops is practically drinkable – deeply savory with notes of wine, herbs, and sweet vegetables.
I also appreciate how forgiving this slow-cooked beef cheeks recipe is. Unlike more finicky dishes where timing is everything, beef cheeks actually benefit from extra time. They’re almost impossible to overcook, making this perfect for busy households or entertaining when you don’t want to be chained to the stove.
Perhaps what you’ll appreciate most is how it transforms your kitchen. As the beef cheeks slowly simmer, your home fills with an aroma that draws everyone to the kitchen, asking what smells so good.
Ingredients
For the Beef:
- 4 beef cheeks (about 3-3.5 pounds), trimmed
- 2 tablespoons vegetable oil or beef tallow
- 3 tablespoons all-purpose flour
- 1 teaspoon kosher salt
- ½ teaspoon freshly ground black pepper
For the Braising Base:
- 2 medium yellow onions, roughly chopped
- 2 carrots, peeled and cut into 1-inch chunks
- 2 celery stalks, cut into 1-inch pieces
- 6 garlic cloves, lightly crushed
- 2 tablespoons tomato paste
- 1 sprig fresh rosemary
- 4 sprigs fresh thyme
- 2 bay leaves
- 1 tablespoon brown sugar (optional)
For the Braising Liquid:
- 2 cups dry red wine (something you’d enjoy drinking)
- 2 cups beef stock (homemade if possible)
- 2 tablespoons Worcestershire sauce
- 2 tablespoons balsamic vinegar
For Serving:
- Fresh parsley, chopped
- Creamy mashed potatoes or polenta
The quality of your beef stock makes a big difference here. If you can make your own, fantastic, but a good-quality store-bought stock works well too. Just try to find one without too much sodium so you can control the seasoning.
For the wine, you don’t need anything expensive, but use something you’d happily drink. I typically reach for a medium-bodied red like Merlot or Malbec.
Substitutions and Variations
One of the things I love about sharing recipes is seeing how people make them their own. Here are some thoughtful adaptations for this tender beef cheek recipe:
Can’t Find Beef Cheeks?
If beef cheeks prove elusive, several alternatives can provide similar results:
- Beef short ribs work beautifully with the same cooking method
- Beef chuck roast cut into large chunks makes a decent substitute
- Oxtail provides similar richness, though with a different shape
- Pork cheeks are an excellent alternative, requiring about an hour less cooking time
Need to Accommodate Dietary Restrictions?
- For gluten-free diets, skip the flour dredging and instead whisk 1 tablespoon of cornstarch with cold water to thicken the sauce at the end
- For those avoiding alcohol, replace the wine with additional beef stock plus 2 tablespoons of red wine vinegar for acidity
Want to Change Up the Flavor Profile?
This braised beef cheeks recipe lends itself to several international variations:
- For an Italian twist, add olives, rosemary, and finish with gremolata
- Go Spanish by incorporating smoked paprika, orange zest, and green olives
- Create an Asian-inspired version with star anise, ginger, soy sauce, and Chinese five-spice powder
My personal favorite variation adds mushrooms to the braising liquid during the last hour of cooking. The mushrooms absorb the rich sauce while adding their own earthy dimension to the dish.
Step-by-Step Instructions
1. Preparing the Ingredients
I’ve learned through trial and error that proper preparation makes all the difference with tough cuts like beef cheeks. Start by thoroughly patting them dry with paper towels – this is essential for getting a good sear. Examine each piece and trim away any tough silverskin (that silvery membrane that won’t break down during cooking) while leaving some fat for flavor.
In a shallow dish, mix your flour, salt, and pepper. Just before cooking, dredge each beef cheek in this mixture, shaking off any excess. This light coating helps develop a crust and naturally thickens your sauce.
While the meat sits at room temperature for about 30 minutes (which promotes even cooking), prepare your aromatics. I recommend cutting the vegetables into larger chunks than you might normally – about 1-inch pieces – so they’ll hold up during the long cooking time.
Pro tip from my kitchen: If time allows, consider marinating the beef cheeks overnight with the wine, garlic, and herbs. This isn’t necessary, but it deepens the flavor considerably.
2. The Cooking Process
Preheat your oven to 325°F (160°C) if using the Dutch oven method. Now, let’s start building flavors:
- Heat your oil or tallow in a large Dutch oven over medium-high heat until it shimmers.
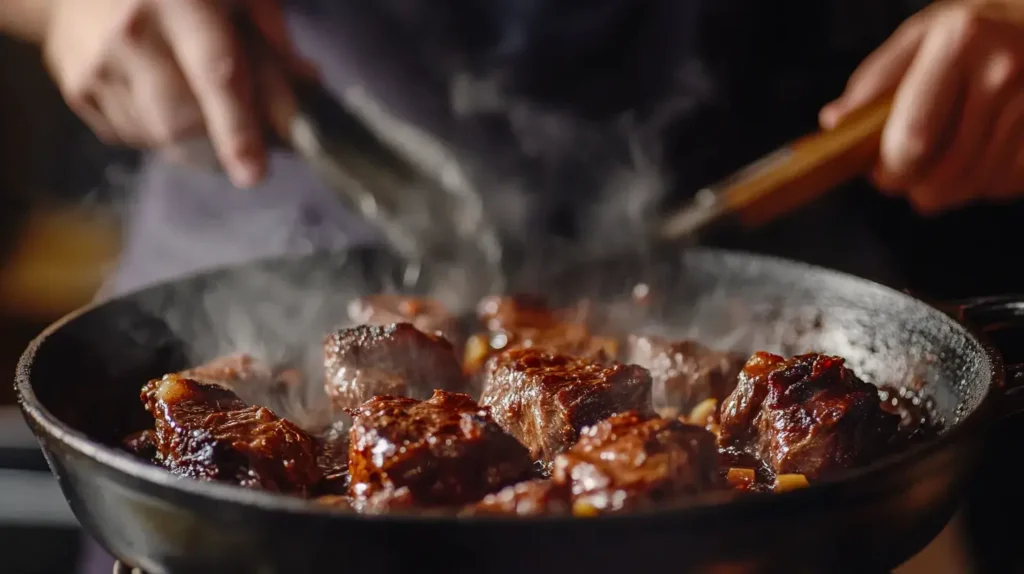
- Working in batches (I usually do two at a time), add the floured beef cheeks and sear for 3-4 minutes per side. You’re looking for a deep brown crust – not just coloring, but actual caramelization. This step creates the foundation of your dish’s flavor, so don’t rush it.
- Reduce the heat to medium and add your mirepoix (onions, carrots, and celery). Cook for 5-7 minutes, stirring occasionally. I like to let the vegetables pick up some color around the edges.
- Add the garlic and cook for just another minute until fragrant. Then add the tomato paste and cook for 2 minutes more. This brief caramelization of the tomato paste transforms it from bright and acidic to deep and complex.
- Pour in the wine and use a wooden spoon to scrape up all those beautiful browned bits from the bottom of the pot. Let it simmer for 3-4 minutes, allowing the alcohol to cook off.
- Return your beef cheeks to the pot along with any accumulated juices. Add the beef stock, Worcestershire sauce, balsamic vinegar, brown sugar, bay leaves, rosemary, and thyme.
- The liquid should nearly cover the meat. Bring everything to a gentle simmer on the stovetop.
- Cover with a tight-fitting lid and transfer to the oven. Now the magic happens – cook for 3 to 3.5 hours, until the beef cheeks are fork-tender.
Alternatively:
- For slow cooker: Transfer everything after deglazing and cook on low for 7-8 hours.
- For pressure cooker/Instant Pot: Cook at high pressure for 50 minutes, followed by a natural release.
- Once tender, carefully remove the beef cheeks to a serving platter and tent with foil to keep warm.
- Strain the cooking liquid, pressing on the solids to extract all that flavor. Return the strained liquid to the pot and simmer over medium heat until it reduces by about one-third and reaches a glossy, slightly thickened consistency – about 10-15 minutes.
3. Finishing Touches
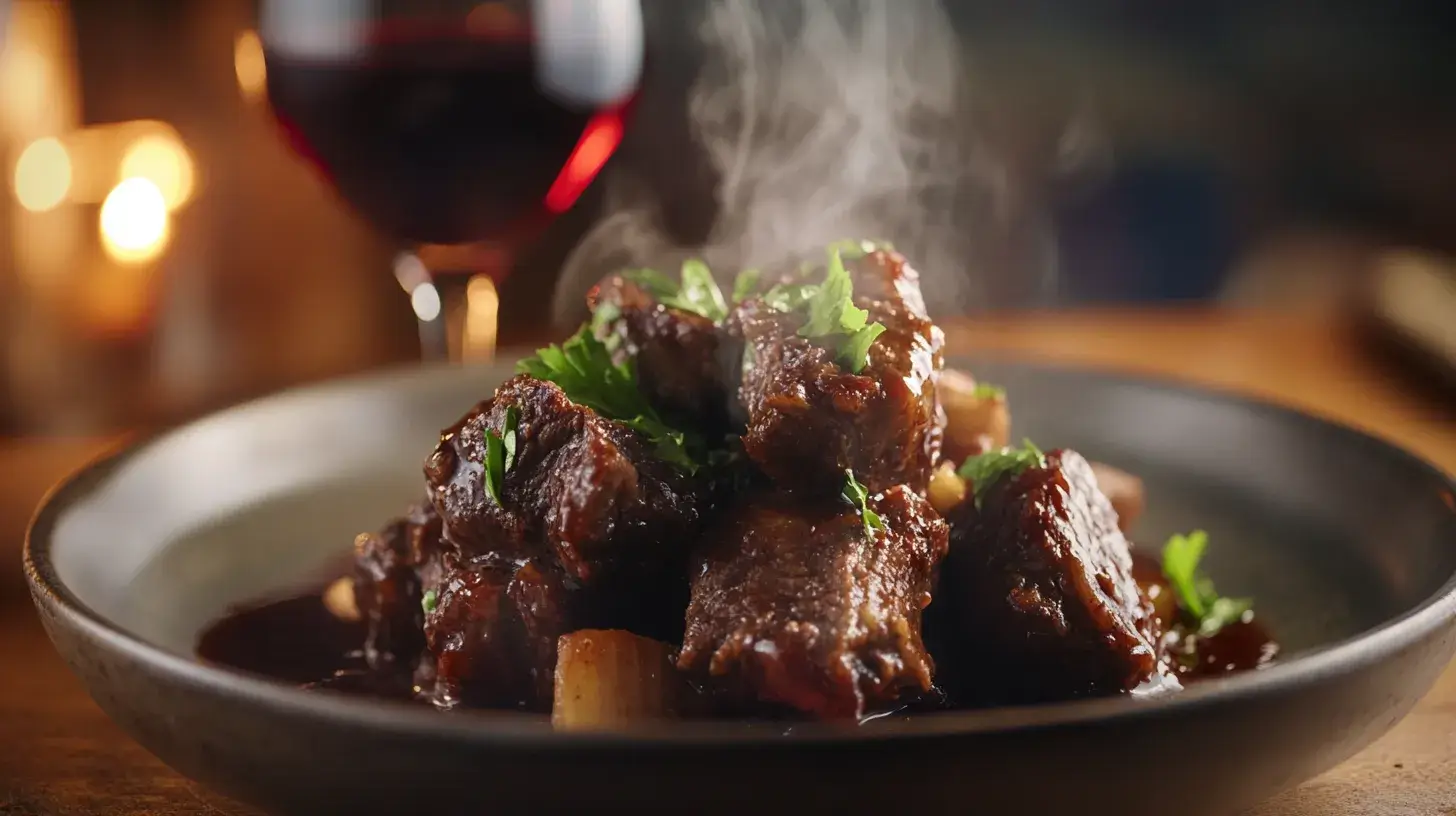
Pour some of the reduced sauce over the beef cheeks and reserve the remainder for serving. For the most impressive presentation, place each beef cheek atop a mound of creamy mashed potatoes or polenta, with sauce drizzled generously over both.
I love adding a final bright element to cut through the richness. A simple gremolata (mixture of lemon zest, garlic, and parsley) sprinkled over the top provides a beautiful contrast in both color and flavor.
If your sauce hasn’t quite reached your desired thickness, you can create a quick slurry with 1 tablespoon cornstarch mixed with 2 tablespoons cold water, then whisk this into the simmering sauce.
Serving Suggestions
After spending hours creating these restaurant-style beef cheeks, they deserve to be showcased properly. I’ve experimented with various accompaniments over the years, and these pairings consistently shine:
Perfect Bases
The silky sauce needs something to catch it:
- Creamy mashed potatoes made with plenty of butter and a touch of roasted garlic
- Soft polenta enriched with parmesan cheese
- Wide pasta like pappardelle or tagliatelle
- Creamy white beans for a rustic, peasant-style dish
Vegetable Sides
To balance the richness:
- Roasted Brussels sprouts with balsamic glaze
- Simply sautéed greens like Swiss chard or kale
- Honey-glazed carrots with thyme
- A crisp green salad with a bright, acidic vinaigrette
I find the beef cheeks pair beautifully with wines that have structure and body. A cabernet sauvignon or syrah works wonderfully, as does a malbec or tempranillo.
What I love most about serving this dish is the reaction it gets. There’s always a moment of silence when people take their first bite – that precious culinary instant when conversation stops because the food demands complete attention.

Recipe FAQ & Troubleshooting
After making this dish countless times and walking friends through the recipe, here are the questions I’m most frequently asked:
Q: I can’t find beef cheeks anywhere! Where should I look? A: Beef cheeks rarely make an appearance at standard grocery stores. Your best bet is a good butcher shop or specialty meat market. If you have a Latin American or Asian market nearby, check there – these cuts are more commonly used in those cuisines.
Q: My sauce never thickened up. What went wrong? A: This can happen if your braising liquid was too abundant. The easiest fix is to remove the meat once tender, then reduce the sauce more aggressively over medium-high heat until it reaches your desired consistency. Alternatively, the cornstarch slurry mentioned earlier works wonders.
Q: The meat is still tough after the recommended cooking time. Help! A: With tough cuts like beef cheeks, the answer is almost always “more time.” Every animal is different, and factors like age can affect cooking time. Return the cheeks to the liquid and continue cooking, checking every 30 minutes until they yield easily when pierced with a fork.
Q: Can I make this dish ahead of time? A: Absolutely! In fact, I recommend it. Make the dish a day before serving, cool completely, then refrigerate overnight in the sauce. This allows the flavors to develop even further. Gently reheat on the stovetop or in a 325°F oven until warmed through.
Storage & Reheating Instructions
One of the beautiful things about this beef cheek stew recipe is that it often tastes even better the next day. Here’s how to properly store and reheat without sacrificing quality:
Refrigerating
After cooling completely:
- Store the beef cheeks in their sauce – this prevents them from drying out
- Keep in an airtight container for up to 4 days
- The fat will rise and solidify on top when chilled – this natural “seal” actually helps preserve freshness
Freezing
These beef cheeks freeze beautifully:
- Cool completely before transferring to freezer-safe containers
- Freeze for up to 3 months
- Always freeze with plenty of sauce to protect the meat
Reheating
My preferred method for reheating:
- Thaw overnight in the refrigerator if frozen
- Place the beef cheeks and sauce in a covered pot
- Heat gently over low-medium heat, adding a splash of beef stock if the sauce seems too reduced
- Warm until the beef cheeks reach 165°F (74°C), about 15-20 minutes, being careful not to boil
For busy weeknights, you can microwave individual portions:
- Place in a microwave-safe container
- Cover with a damp paper towel
- Heat at 70% power in 1-minute intervals, checking between each
The beauty of having these prepared in advance is that you can enjoy a sophisticated meal any night of the week with minimal effort.
Related Recipes
If you enjoy this beef cheek meat recipe, here are a few other dishes in my repertoire that share similar techniques or flavor profiles:
Ultimate Homemade Lemon Pepper Chicken Tenders – While not beef-based, this crispy and juicy dish shares a similar attention to seasoning and texture for an indulgent experience.
Baconnaise Smash Burger – This juicy, flavor-packed burger features a crispy seared beef patty with a bacon-infused mayo that brings out rich, meaty flavors similar to slow-cooked beef cheeks.
Philly Cheesesteak Stuffed Cheesy Breadsticks – A hearty, beefy dish with tender ribeye steak, caramelized onions, and gooey cheese, reminiscent of the deep umami flavor found in braised beef cheeks.
Print
Melt-in-Your-Mouth Braised Beef Cheeks
- Total Time: 3 hours 50 minutes
- Yield: 3 hours 50 minutes 1x
Description
This braised beef cheek recipe transforms a tough, collagen-rich cut into fall-apart tender meat with deep, rich flavors. Slow-cooked in red wine and aromatic herbs, this dish is perfect for a comforting family dinner or an impressive dinner party. Serve with creamy mashed potatoes or polenta for the ultimate indulgence!
Ingredients
For the Beef:
- 4 beef cheeks (about 3–3.5 lbs), trimmed
- 2 tbsp vegetable oil or beef tallow
- 3 tbsp all-purpose flour
- 1 tsp kosher salt
- ½ tsp freshly ground black pepper
For the Braising Base:
- 2 medium yellow onions, roughly chopped
- 2 carrots, peeled & cut into 1-inch chunks
- 2 celery stalks, cut into 1-inch pieces
- 6 garlic cloves, lightly crushed
- 2 tbsp tomato paste
- 1 sprig fresh rosemary
- 4 sprigs fresh thyme
- 2 bay leaves
- 1 tbsp brown sugar (optional)
For the Braising Liquid:
- 2 cups dry red wine (Merlot or Malbec recommended)
- 2 cups beef stock (homemade preferred)
- 2 tbsp Worcestershire sauce
- 2 tbsp balsamic vinegar
For Serving:
- Fresh parsley, chopped
- Creamy mashed potatoes or polenta
Instructions
1. Prep the Beef Cheeks:
- Pat dry the beef cheeks with a paper towel and trim any tough silverskin.
- In a shallow dish, combine flour, salt, and pepper. Dredge each beef cheek in the mixture, shaking off excess.
2. Sear the Beef Cheeks:
- Heat oil or beef tallow in a Dutch oven over medium-high heat until shimmering.
- Sear the beef cheeks for 3-4 minutes per side until deeply browned. Remove and set aside.
3. Sauté the Aromatics:
- Reduce heat to medium and add onions, carrots, and celery. Sauté for 5-7 minutes, stirring occasionally.
- Add garlic and cook for 1 minute until fragrant.
- Stir in tomato paste and cook for 2 more minutes.
4. Deglaze & Add Liquid:
- Pour in red wine, scraping up the browned bits from the bottom. Simmer for 3-4 minutes.
- Return the beef cheeks to the pot. Add beef stock, Worcestershire sauce, balsamic vinegar, brown sugar, bay leaves, rosemary, and thyme.
5. Braise the Beef Cheeks:
- Bring the liquid to a gentle simmer, then cover and transfer to a 325°F (160°C) oven.
- Cook for 3 to 3.5 hours until fork-tender.
6. Reduce & Finish:
- Remove the beef cheeks and tent with foil.
- Strain the sauce and simmer until reduced by one-third (10-15 minutes).
- Serve the beef cheeks over mashed potatoes or polenta, drizzling with reduced sauce.
- Garnish with fresh parsley and enjoy!
Notes
- For a gluten-free version, skip the flour and use a cornstarch slurry to thicken the sauce.
- For a non-alcoholic version, replace wine with extra beef stock and 2 tbsp red wine vinegar.
- For extra depth, marinate the beef cheeks in wine, garlic, and herbs overnight before cooking.
- Prep Time: 20 minutes
- Cook Time: 3 hours 30 minutes
- Category: Dinner
- Cuisine: French / Italian
Nutrition
- Serving Size: 4 servings
- Calories: ~520 kcal Per Serving
- Fat: 30g
- Protein: 45g
Keywords: braised beef cheeks, slow-cooked beef cheeks, beef cheek recipe, red wine braised beef, melt-in-your-mouth beef cheeks
Conclusion
There’s something deeply satisfying about mastering a dish like braised beef cheeks. It connects us to centuries-old cooking traditions while creating something that feels special and modern. I love how this recipe transforms a humble cut that many people overlook into something genuinely luxurious.
What I find most rewarding about sharing this recipe is knowing that someone else might discover the same joy I did when I first tasted properly cooked beef cheeks. That moment when the meat yields to the gentlest pressure from your fork, when the glossy sauce coats each bite perfectly – it’s what makes cooking worth the effort.
This dish embodies what I love most about slow cooking: the anticipation as aromas fill your home, the transformation of simple ingredients into something extraordinary, and the pleasure of sharing something truly delicious with people you care about. While it does require time, most of that is hands-off, allowing you to go about your day while dinner practically makes itself.